Technical overview#
The IDS toolkit is a simple javascript module that can be integrated into any website.
When the module is loaded on a webpage, a process-page can be initiated by calling the global __init_toolkit__
function,
with the url of the process-page description file as argument.
The Process-Page is a json file that describes the process-page. It links (or includes) the process, which describe the services of a process, which contain activities.
The essential parts that define what a process can do, and how a user can interact with it, are the activities and the ui-elements of services.
The toolkit provides a set of json-schema files, that can be used to validate the process-page, process, bridge. There is also a json-schema file that integrates all of them and provides validation for an integrated proces-page description file. The json-schemas are described here in more detail in the Schemas section.
Installation and setup#
The javascript can be integrated like this:
<!-- index.html -->
...
<script src="path/to/toolkit/index.js"></script>
...
<body>
  <!-- your static content in case the process-page is not generating the page -->
  <script>
      window.onload = function() {
          try {
              _init_toolkit_(`path/to/process-file.json`)
          } catch (e) {
              console.error(e)
          }
      }
  </script>
</body>
While developing new processes it is recommended to start generating the page and then switch to map-mode, when all activities and interactions with the services are set.
While writing the instances of the individual components it might be useful to use a json-schema validator, to constantly check the validity of the json files. There are 4 json-schema files. One for the process-page, one for the process and one for the bridge and one that combines all of them, which is a extended json-schema for a process-page (which can integrate the other instances). The json-schema files can be found here in the toolkit repository. A documentation for the individual components can be found here.
The toolkit has a robust validation system integrated, next to the json-schema validation raising errors about missing or wrong defined components.
Overview#
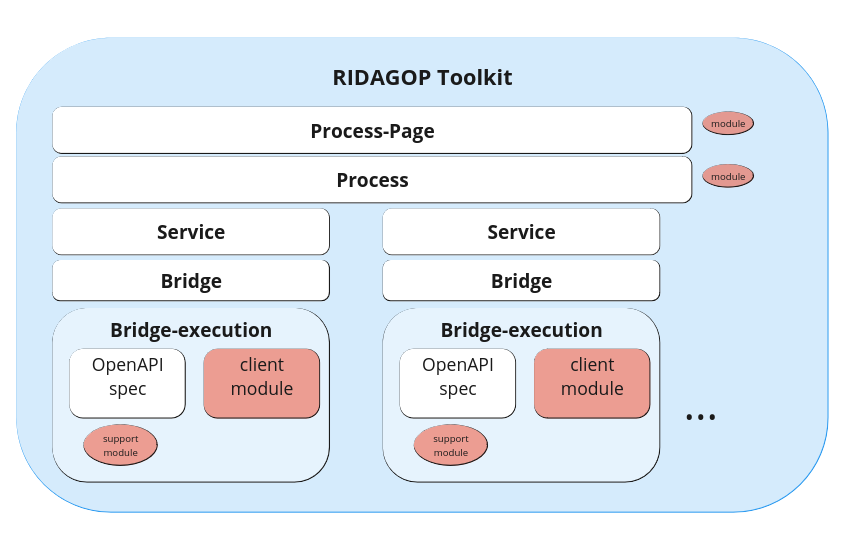
Following components of a complete process can be separated into different json files (instances):
- Process-Page
- Process
- Bridge
- Bridge-execution (one of the following)
- OpenAPI-specification
- client-module (javascript module)
However, it also possible to combine all components into one file (except the OpenAPI spec and the client-module).
In addition, there can be separate javascript modules, that be referenced by specific optional components:
- Process-Page module (
scriptUri) - Process module (
scriptUri) - Bridge module (
supportModuleUri)
These modules can be used to define custom functions, that can be used for activities which modify some data before or after interacting with a service. When a function is defined in multiple modules, the one of the most upper one module is used.
Further detail about the components can be found in their respective API documentation.
View modes#
Process pages can be displayed in two different view modes. Either the page can be completely generated, meaning all input html elements will be generated (build-mode) in map-mode, where the defined interaction elements will be mapped to existing html on the page. Read more about the 2 view modes on the User interface page.
Process-Page#
One critical property of the process-page is the local_prefix_path. It sets a prefix for all instances (json
descriptions of process, bridges, openapi files) and scripts (client module, support modules).
In case an instance url specifies a relative path instead of an absolute url, this prefix will be used to resolve the
path. Note that if the prefix_path starts with a / it will be resolved relative to the domain of the page, otherwise
it will be resolved relative to the path of the process-page.
Read here full details of the process schema.
Process#
A process defines a set of services, which describe how the user can interact with external services.
A service, which has a bridge defines a set of activities and ui-elements that can be used to interact with the
service.
Next to the services the process can also define a common object, activities and ui-elements.
This is particular useful, when activities, need to call other activities from other services (in subActivities).
Read here full details of the process schema.
Services#
Services are defined within a process and represent the interactions with external services that is used in the process. However the main part of a services, Most importantly the process-page definition of a service can (full schema):
- define a new bridge
- define autostart activities
- define service-wide parameters
- specify to show/hide sections of the UI
The process instance defines the crucial parts of a service, which are (full schema):
- define a new bridge
- activities
- define autostart activities
- define service-wide parameters
- sequences (of activities, that can be triggered by buttons)
UI-Elements#
The UI-Elements are defined per service. There are five types of UI-Elements that can be defined, which can be used for activities:
- Input fields: For text input
- Buttons: Buttons can be used to trigger activities
- Selects: For selecting a value from a list
- Checkboxes: To select from a boolean option
- File-inputs: To load files that can be used as input for activities
See the UI-Elements section for more details.
The common section#
Besides the services, there is another section to a process that can include activities and some ui. This common section, does not require a bridge, but define its own activities by executing functions in the modules of the process-page or process. However, activities (and/or subActivities) can also be references and buttons in the ui of this section can trigger activities of all of the services.
Activities#
Activities are defined in the process and describe the interaction with a service. Activities are referring to some execution, which is defined in the bridge of the service.
Activity execution#
Every activity needs to specify what execution of the bridge is should invoke. This is done by specifying
the bridgeCapability or the moduleFunction property.
In the case of the bridgeCapability property, it will invoke a capability that is defined by the bridge of the
service.
In the case of the moduleFunction property, it will invoke a function that is defined in the module that the
process-page or process include (with scriptUri) or the supportModule of the bridge.
Autostarting activities#
Activities can be autostarted, meaning they will be triggered as soon as the process-page is loaded (and valid).
The autostart property takes a single string or a list of strings of activity-names.
Required activities#
Activities can refer to other activities (of the same service) that need to be executed before, this activity can be executed. This is in order to guarantee that some data, that is required by an activity are loaded/processed (by the required activities).
Activity parameter#
Activities generally require some parameters, which are the parameters of the execution of the activity. The parameter description defines where the values of the parameters are coming from. The following parameter sources are possible:
- Field
- Parent
- Previous
- Constant
- Store
- QueryParam
- FileInput
- Generate
- Dynamic
Field#
Takes the input of an UI field (not UI File-input), which can be
The parameter .field (string) should be set to the name of the ui element.
- InputField
- CheckBox
- SelectInput
In addition, parameters of type inputFields can have the property fromQueryParam (string), which turns this
inputfield into a readonly field, where the value
is already set by the url query parameter of the given name.
Parent#
Parent parameters .parent (true) works inside subActivities and take the result of the parent activity. This is a
boolean
parameter, which just needs to be set to true to indicate that the parent result is used for this parameter.
The example at the bottom of the page shows
   {
  "read_lc_hub_data": {
    "title": "Fetch project data",
    "bridgeCapability": "read_dataset_metadata",
    "preProcess": "checkProjectID",
    "parameters": {
      "project_id": {
        "field": "project_id"
      }
    },
    "subActivities": {
      "displayLabels": {
        "title": "Display project labels",
        "moduleFunction": "display_project_labels",
        "parameters": {
          "lc_hub_project_data": {
            "parent": true
          }
        },
        "ui": {
          "resultAsOutputHtml": true
        }
      }
    },
    "comment": "input_field can be omitted if there is an input_actions set"
  }
}
Previous#
Previous (.previous) (true) is similar to Parent, but it uses the results of the activity in the chain of
subActivites.
This parameter simply needs to be set to true.
Constant#
.constant (string) specifies a constant value, does not change.
Since parameters for all activities can also be defined on a global level (on the process-page or process).
It is useful for values, which should change in use cases (e.g. changing a fixed data repo url).
The value .fromQueryParam can also be set, which would (if given) overwrite the constant value, with the value set in
the query parameter of the given name.
In the given example we define a parameter project_id which has a constant value. However, if the page was called
with the query-parameter pid it will use that value in the query-parameter instead.
{
  "project_id": {
    "constant": "2198e4f7-b161-ac8c-2554-4b153d7ebce8",
    "fromQueryParam": "pid"
  }
}
Store#
Retrieve data that was previously stored. See Storing results section.
Note that, the key, can a path, which can be retrieved with lodash get, meaning that
you can access nested values (e.g. metadata.project_id). The context is option and by default 'service'.
QueryParam#
.queryParam (string) reads the parameter value from the url query parameter of the given name
FileInput#
fileInput (string) reads the data from a file-input user element. This is generally used to fill the body of
a post request with data, that the user might have stored on their computer.
Generate#
.generate (object) works similar to an activity itself. The object should include a bridgeCapability
or moduleFunction and eventual parameters properties, which will be executed everytime the parameter is required.
Dynamic parameter#
And additional property of parameter definitions is dynamic (true). This postpones the validation if the user input
field elements
exists to the moment when the activity is executed. This is required, when the process specifies dynamic UIElements.
The following example defines a parameter that reads the value of a dynamic inputfield called nonENLabels
{
  "includeNonEnglishLabels": {
    "field": "nonENLabels",
    "dynamic": true
  }
}
Preprocess execution#
It is also possible to refer to a module-function that is executed before the activity is executed (preProcess
string).
The preprocess activity takes the same parameters as the actual activity in form of a json-object (keys are parameter
names) and can return json objects, where every key overwrites the parameter passed to the actual activity.
Preprocess can also throw Errors, with the cause: cancel, in order to cancel the activity execution.
Handling activity results#
Storing results#
The results of an activity can be stored in order to use them in other activities. The result can be stored in three different contexts, which defines, which other activities can access them. These contexts are:
- Process: The result can be accessed by all activities of the process
- Service: The result can be accessed by all activities of the service
- Activity: The result can be accessed by sub-activities
Special results handling#
Besides storing the results, there are also some special results handling options:
Html Output#
The result of of an activity can be some HTML, which can be displayed in the UI.
For generated UIs there is a standard output section for each service, in that case, the property resultAsOutputHtml
just needs to be true.
For mapped UIs, the property resultAsOutputHtml should specify a string, which should be the id of the html
element, where the result should be displayed.
Dynamic UI Elements#
The result of an activity can also be used to dynamically generate UI elements. The result of the activity should be a
json-object that has the same structure of service uis (schema: Process Service-UI)
The Ui-elements are added the Html-Element with the id {service.name}_dyn_ui (or {service.name}_dyn_ui_pre).
Sub-activities#
An activity can also define sub-activities. These sub-activities are executed after the activity main (parentActivity)
is executed.
Bridge#
Each service requires a bridge, which defines how the activities are executed. There are two basic types of bridge executions:
- OpenAPI: The bridge is defined by an OpenAPI specification. The activities are executed by calling the endpoints of the OpenAPI specification. Learn more about OpenAPI at openapi.org
- Client-Module: The bridge is defined by a javascript module, which defines functions that can be called by the activities.
The main part of the part consists of a mapping between capability names and parts of the execution (either operations
in the OpenAPI specification or function names). The capability names should be from a defines set of names
(read_dataset_metadata, write_dataset_file, ...)
which can
be found here
or arbitrary names that must begin with an underscore (e.g. _filterData). The idea of a defined set of names is to
have semantic consistency among different data repository system bridges.
Each service must have a service bridge definition (either in the process-page or in the process). The definition
contains
a source properties which in itself either contains a source property (containing the whole bridge description. or
a uri property , which is the uri of the bridge instance. The bridge definition can also include server property,
which can specify how the server uri of an OpenAPI bridge should be and how the authorization is made.
A bridge definition contains following properties.
Let's look at an example. This is how the bridge for dataverse is used in order to facilitate to read the metadata of a
dataset, update the metadata on a dataset.
In the service data_repo of the process we have this bridge property.
{
  "bridge": {
    "source": {
      "uri": "instances/bridge/dataverse_bridge_openapi.json"
    },
    "server": {
      "field": "dataverseInstance"
    },
    "authorization": {
      "ApiKeyAuth": {
        "field": "apiKey"
      }
    }
  }
}
This property first of all specifies where the bridge can be found.
It also specifies that the server url can be taken from the field dataverseInstance that is defined in
the inputFields of the service ui; and that authorization is done with an ApiKeyAuth. For this part is required to
understand the authorization schema of the openapi schema of the service and knowing how authorization is specified in
OpenAPI might be useful (see here).
The file dataverse_bridge_openapi.json contains the following (we just kept the relevant capabilities for this
example)
{
  "capabilities": {
    "read_dataset_metadata": {
      "operation": {
        "path": "/api/datasets/:persistentId/",
        "method": "get"
      }
    },
    "update_dataset_metadata": {
      "operation": {
        "path": "/api/datasets/:persistentId/versions/{versionId}/",
        "method": "put"
      }
    }
  },
  "execute": {
    "openapiSchemaUri": "openapi/dataverse_openapi.json"
  }
}
Here we see how the capabilities named read_dataset_metadata and update_dataset_metadata are mapped to certain
operations. Instead of having path and method it would also be possible to just use operationId which identifies a
unique operationsId in the openAPI instance.
Note that OpenAPI files cannot be integrated into the bridge itself, because they are not strictly json-schema Draft-7 compliant.
Globally calling activities and accessing store variables#
In some cases it might be necessary to call activities or read store variables in arbitrary javascript code (for example added process js modules). There are several functions defined on the global toolkit object that can be used for that.
// the toolkit is attached to the window object so it can be retrieved like that:
let toolkit = getToolkit()
Executing activities#
Execute an activity of a service
The function has the following signature:
async executeActivity(serviceName: string, activityName: string, params: { [paramName: string]: any } = {}, body?: any)
with the parameters:
- serviceName: The name of the service
- activityName: The name of the activity
- params: additional parameters, overwriting the default parameters the activity would use.
- body: the body (for POST requests of OpenAPI bridges)
The activity is using the parameters as defined in the service as normal, but an object of parameters can be passed, which will overwrite the parameters of the activity.
Retrieving stored data#
Get a storage value from the process (when no service name is given) or from a service
The function has the following signature:
getStorageValue(key: string, serviceName?: string): any
with the parameters:
- key: key of the stored value
- serviceName: name of the service (optional)
Returning whatever is stored under that location.
Reading UI Values#
It is also possible to read ui element values with the function of the following signature:
async getUIValues(type: "inputFields" | "checkBoxes" | "buttons" | "fileinputs" | "selects",
serviceName: string = "process")  Promise<{[uiElemName: string] : any}>
which will return an object with ui elements names as keys and their respective values.
Deployment#
The structure of the filesystem on the server is left to the developer.
Generally instances like the process-page, process and bridges can be referenced with relative urls.
A local_prefix_path can be included in the root of the process-page description that is used for all instances and
modules, when they have relative paths.
Beware that the toolkit-schema (schemaUri on the process-page root) must have an absolute url. Also modules, should
generally have absolute urls, because of the way webpack requires module paths to be.
An example structure could be as following:
  root-path
  ├── index.html  (an overview of all processes)
  ├── data
  │   ├── instances
  │   │   ├── process-page
  │   │   │   └── lc_hub_no_ui.json (the process-page description)
  │   │   ├── bridge
  │   │   │   └── dataverse_bridge.json (the bridge description)
  │   │   └── process
  │   │       └── ...
  │   ├── openapi
  │   │   ├── dataverse_openapi.json (the openapi specification)
  │   │   └── localcontexts_openapi.json (the openapi specification)
  │   ├── schemas
  │   │   └── ridagop-ids-toolkit.schema.json (the toolkit schema)
  │   └── scripts
  │       └── lc_hub.js (the process-page module script)
  ├── pages
  │   └── lc_hub_labels
  │       ├── assets
  │       │   .... (images, css)
  │       └── index.html (the process page)
  └── toolkit
      └── index.js (the toolkit module)
Simple example#
Consider the following 3 files which contain the process for reading and displaying Local Contexts Labels. It uses one services, which has an OpenAPI bridge and one additional process module. The structure is as compact as possible, defining the process directly inside the process-page and the bridge of the lc_hub service also inside the service description.
Instead of having the process inside the process-page, we could also have it in a separate instance